Thursday, November 20, 2014

Edible Goop #2

Now that Jaxson is almost 19 months, I decided to try out another goop recipe to see if he liked it more this time.

I personally liked this goop the most so far, and Jaxson was actually interested in playing with it a bit this time, which was nice :-)

I tried a really simple recipe - just 1 tbsp xanthan gum and 1 3/4 cups water whisked together, food colouring, and then a box of corn starch kneaded in!

First off, I love how easy it was to make!

The texture is a bit like play dough - it doesn't stretch as much as I wanted it to, but I still like it, and Jaxson seemed to dig it way more than the last couple of times! He actually sat and played with it for a bit!

This kind of thing doesn't entertain him for long though - he's such a busy body, he won't sit still for too long! Haha but at least he sits long enough for me to get some wicked photos!

What the heck is this?

Eww!

Ok, having fun now!

Monday, November 10, 2014

Homemade Hair Pomade

Adrian has recently started taking on more managerial shifts at work, working more with customers than in the back of house, and so has started needing to dress up a bit. He therefore needed a product for his hair, but as neither of us use awful, unnatural products, I decided I would make him a pomade to use!

He has been using it for a few weeks now and it works really well, which is saying something, because he has ridiculously thick, curly hair. The pomade's hold is good (it lasts a whole shift), it smells great, and it looks good too!

My recipe:
3tbsp beeswax (this amount can vary based on the hold needed!)
1tbsp grapeseed oil
1/4 cup + 1tbsp coconut oil
7 drops cedarwood essential oil
4 drops rosemary essential oil
5 drops tea tree oil

As usual, heat the harder ingredients in a  double boiler until they are completely melted, then remove it from the heat and add your liquid oil and essential oils until you get to the scent you like.

You can play around a bit with this recipe depending on how much hold you need it to have. Adjust the amount of beeswax and liquid oil you use based on how unruly your hair is! Adrian's hair is very thick and dry, so I used more beeswax than would usually be necessary. 


Because I needed to add so much beeswax, it is a bit hard, but it melts very nicely in the palm of your hand!

Adrian's curly, thick, unruly hair sans-pomade

And with pomade! What a difference, and it stays all night!
All these ingredients have amazing benefits for your hair and scalp:

Coconut Oil: coconut oil is a wonder substance. It seems like it's good for everything, both internally and externally. And for hair, it is absolutely amazing. It's good for all hair types. It helps with damaged hair and split ends. It is also amazing for the scalp and follicles and can really help with all issues, from dandruff to lice to hair loss (which Adrian definitely doesn't need help with). It also adds luster and softness to hair (which in Adrian's case, is an added bonus! His hair is like straw!).

Beeswax: beeswax can also act as a stimulant for hair growth, and is a great thickening agent for something like a pomade as it helps to give volume to your hair. It adds shine and protects hair, making is softer and more manageable. Because it is a thick wax, beeswax also helps protect your hair from environmental damage, which in the prairies, is necessary.

Grapeseed Oil: like coconut oil, grapeseed oil is a natural softener and moisturizer. It helps keep your hair soft, strong and healthy and is lighter than other oils, so doesn't leave your hair feeling too oily. Grapeseed oil helps repair damaged hair and split ends by locking in moisture. It is also great for the scalp and can help address issues like dandruff.

Cedarwood Oil: cedarwood is both relaxing, comforting, and helps with focus/mental clarity. It is also a great oil to use to help with insomnia. It is a good oil for normal hair and stimulates the scalp which can help with hair regrowth and dandruff, etc.

Rosemary Oil: rosemary oil also helps with mental alertness and is a great oil to use when you are overworked and fatigued. It also stimulates the roots and improves circulation to the scalp.

Tea Tree Oil: tea tree oil is incredibly refreshing and cleansing. It is an immune stimulant and helps with both mental and physical stresses. This oil is also a great remedy for dandruff and dry scalp.

Friday, October 31, 2014

Homemade Halloween Decorations!

This Halloween was the first one I've really felt like I could decorate! I have a family, I'm an adult, and we live in a place big enough for me to do this kind of thing! 

I didn't want to spend a lot of money on decorations, so I hit Pinterest for some easy, fun ideas! For what I wanted to do, I had to get started early...

My main decorations were using wine and gin bottles that I spray painted and then decorated by hand, so I needed to spray paint them in the summer, while it was still warm enough to! So I did this first step in September. I chose what I wanted to make with the bottles I had, and then spray painted them.

These are all the bottles, for both Halloween and Christmas decorations.
After that, I had a bit of leeway to gather my supplies and paint/decorate them in my own time. The results were better than I could have hoped!

This one was probably one of my favourites, just because it was so simple! Spray painting it was a two step project: first, I sprayed it gold and then once it had dried, Adrian helped me wrap rubber bands around it and I sprayed it a matte black.


Then, all I did was add on a couple googly eyes, and BAM! Instant mummy!


This ghost was so simple too. I found some clear stickers to put on glasses at the dollar store and cut out some eyes and a mouth that I liked, stuck it on, and then painted over the edged to help them stick and blend into the bottle, and it was done!


My three Tanqueray bottles became a monster family, complete with googly eyes and pipe cleaner hair! The dad's hair is curly, just like Adrian's! haha these ones I was most proud of! I think they turned out really well, and mouths are fun, and again, they were so so simple!


Since the bottles turned out so well, I got craft-crazy and wanted to do so much more. My next, simple project was to draw and cut out silhouettes from construction paper to tape into the inside of our lamp shades. Nice and easy!


The wreath was the only thing I really spent money on, and I still only bought a few clearance items at Michael's to piece together. A little hot glue, and bam!


Another thing I made was glow in the dark ghosts to hang outside. For these, I bought Styrofoam balls and cheese cloth at the dollar store. I used wire I found in our tool box to make the arms and then I dipped the cheese cloth in a mixture of mod podge and glow in the dark paint and draped it over the Styrofoam balls, which I perched on old bottles so they could dry off the table. Again, the result was awesome and they looked great swaying in the wind in our front yard!


The last thing I did was a last minute spur of the moment thing after I found this craft pumpkin at Value Village. It was pretty ugly, so I painted it orange and then made the lettering out of pipe cleaners and hot glued them on. Adrian even helped with this one, obviously bored one night, and made the exclamation mark!


This project was so much fun for me to do. It gave me a creative outlet while Jaxson napped, and kept me busy for a couple of weeks! 

So much fun on a budget, and so easy!

Sunday, August 24, 2014

Black Bean Brownies

Now,  before you judge this recipe, keep reading and give it a chance! I was a little skeptical at first, but regardless,  thought it would be worth trying at least once.

I found a similar recipe months ago while looking though healthy desserts,  and stored the idea away for a time when I had a random can of black beans hiding in my pantry.

I'm happy to announce that I finally did have that can,  and also a very wicked chocolate craving, as I always do when I decide to bake! Another great thing about these is black beans are fairly high in iron, and if you're anything like me, when you're craving chocolate, you could also do with a dose of iron! ;-)

Another perk to these is they are gluten free, which is something my family and I have recently become.

First off, I was incredibly pleased with how easy this recipe was. Stick all the ingredients in a blender and blend till smooth.  Brainless,  just how I like my baking!

There are a number of variations of this recipe online,  including eggless or sugar-substitute ones.
I didn't choose those. :-)

My chosen recipe has eggs AND sugar. I mean,  they are brownies after all...

Here it is:

Preheat oven to 350° and grease an 8x8 inch pan.

Blend the following ingredients in a blender or food processor: (I used our ninja- best blender ever!)


1 can black beans,  drained and rinsed
3/4 cup sugar
1/4 cup cocoa powder
3 tbsp oil
3 eggs
1 tsp vanilla
A pinch of salt

Pour into the pan and sprinkle with chocolate chips.


Bake until the top is slightly crispy and the edges pull away from the side of the pan. This took me about 40 minutes.


Something I thought pretty cool is Adrian couldn't even tell what they were made of! They were so chocolatey and rich!


Friday, August 22, 2014

My First Wood Staining Experience

I found these gorgeous, handmade wood pieces at a garage sale a few weeks ago for $1 each and just had to get them! I wasn't sure exactly what I wanted to use them for, but I thought they would make yet another awesome diy craft for me this summer. Jaxson is an amazing napper, and while his schedule is slowly starting to change, he does still have at least one 2-3 hour nap a day, and if I use my time wisely, that's a great chunk of time to get stuff done!

Naturally, i've been taking full advantage of that and have been trying my hand at some new things, including knitting, round looming, painting, gardening, and now this: wood staining!

Unfinished pieces, they're even beautiful as they are, non?

I bought a gel stain at Rona and a varnish overcoat so at least the wheel barrow could handle being outside. The wheel barrow also came with a couple small pots that I immediately planted some mini dahlias in, so I wanted to make sure I could water them in it without warping the wood. 


The process was amazingly simple, incredibly fun, and was over before I knew it! I finished staining both pieces, and cleaning up before Jaxson even woke up! The gel stain was great - it was way thicker than I expected it to be, but I liked that. There was zero spatter onto myself, and it went on evenly and simply!


Stained and ready to weatherproof!

I let them dry outside overnight and then coated them with the waterproofing varnish and voila! I'm really impressed with how easy this was to do, and at how good they look! I had a ton of fun doing this, and now make it a point of looking for wood pieces at garage sales or thrift stores that I can sand down and stain! 

Now I just have to be careful to buy useful things and not get stuck just buying for the sake of staining! We've all been there, right? Right??

I love the natural stain outside, because it just finished this piece nicely and doesn't detract from the beautiful plants!

This little tool box became my handy-dandy beside-the-couch lotion, nail clipper, kleenex holder, phone and tablet charger! It looks great and is compact so I have more space for my cups of coffee in the morning!


Tuesday, August 19, 2014

Homemade Tooth Paste and Tooth Powder

A few months ago, I decided to try making my own toothpaste once we had run out of the expensive, natural kind we were using. A friend of mine here in Saskatoon had tried it with pleasant results.

There are a ton of recipes online, and it took me the better part of Jaxson's nap to do some research and decide on one that a liked... And I couldn't even narrow it down to one after all that! I found two very different recipes and liked the sound of both of them, so I decided to make just a small batch of each!

I wasn't worried about either of these cleaning our mouths, because all the ingredients are cleansing, antibacterial and/or antimicrobial. I mean, I use coconut oil to oil pull with amazing results!

These are the two recipes I tried:

Wellness Mama's Remineralizing Tooth Powder, with my own variations based on my ingredient availability

I made this recipe as follows:

3 tbsp bentonite clay
1 tbsp baking soda
2 tbsp crushed mint leaf (ground with a mortar and pestle)
1 tbsp cinnamon powder
1 tsp ground cloves
Peppermint essential oil to taste

Crunchy Betty's Coconut Oil Toothpaste, again with my own small variations based on research and the availability of ingredients.

For this recipe, I used everything except the glycerin:

3 tbsp coconut oil
3 tbsp baking soda
Stevia extract to taste
Peppermint essential oil to taste

Both Adrian and I have been using them for a few months now and we both like them a lot!

:-) 

To be honest, it's kind of nice having two different kinds - that way, I have some choice. More often than not, I use the tooth powder in the morning and the paste at night.

Pros for these recipes:
1. They last forever! A single batch of each lasted Adrian and I almost 3 months.
2. Both keep my breath fresh and mouth clean all day.
3. The coconut oil one helps whiten teeth - at least I noticed a difference when I used that one exclusively.
4. Both taste great!


Cons for these recipes:
1. The powder texture takes a bit of getting used to and you really need to rinse out your mouth or you'll have a brown, gritty smile!
2. Both make a bit of a mess of your sink - the coconut oil paste requires washing with hot water, the powder just requires a quick wipe down.
3. The coconut oil paste hardens and needs to be scooped out with a finger or knife.

I ended up making another batch of toothpaste a couple weeks later, to take up to the lake with me so I could leave the original batches at home for Adrian, who had to come back before me for work. For this paste, I tried halfing the amount of baking soda, because I found the original recipe quite salty and have read that it can cause tooth sensitivity, though neither Adrian nor I, nor my friend and her husband have noticed this. I have to say, though, I do prefer the paste with less baking soda, and I still feel just as clean and fresh!

Tooth powder on the left, paste on the right

I'm super happy with all of these recipes, and am enjoying the nice, all-day clean and fresh feel!

Friday, August 15, 2014

Cinderblock Gardening

This spring, we moved upstairs in the house we were living, and therefore got more creative liberty with the yard and garden. Being on a budget, as we are, I started looking on Pinterest for DIY Planter Boxes and fell in love with the cinderblock look!

We found some, incredibly cheap, at the ReStore in Saskatoon, and went to town! Other than cinderblocks, all you need is construction adhesive, hardware cloth or chicken wire, and landscaping cloth.

Adrian and I had fun piecing them together and finding the pattern that looked the best. We settled on two walls - one for mostly culinary herbs, but also some splashes of colours with flowers, and one in our sitting area featuring bug repelling plants. 

I'm in love with the look, and they have done so well! I've really been impressed.

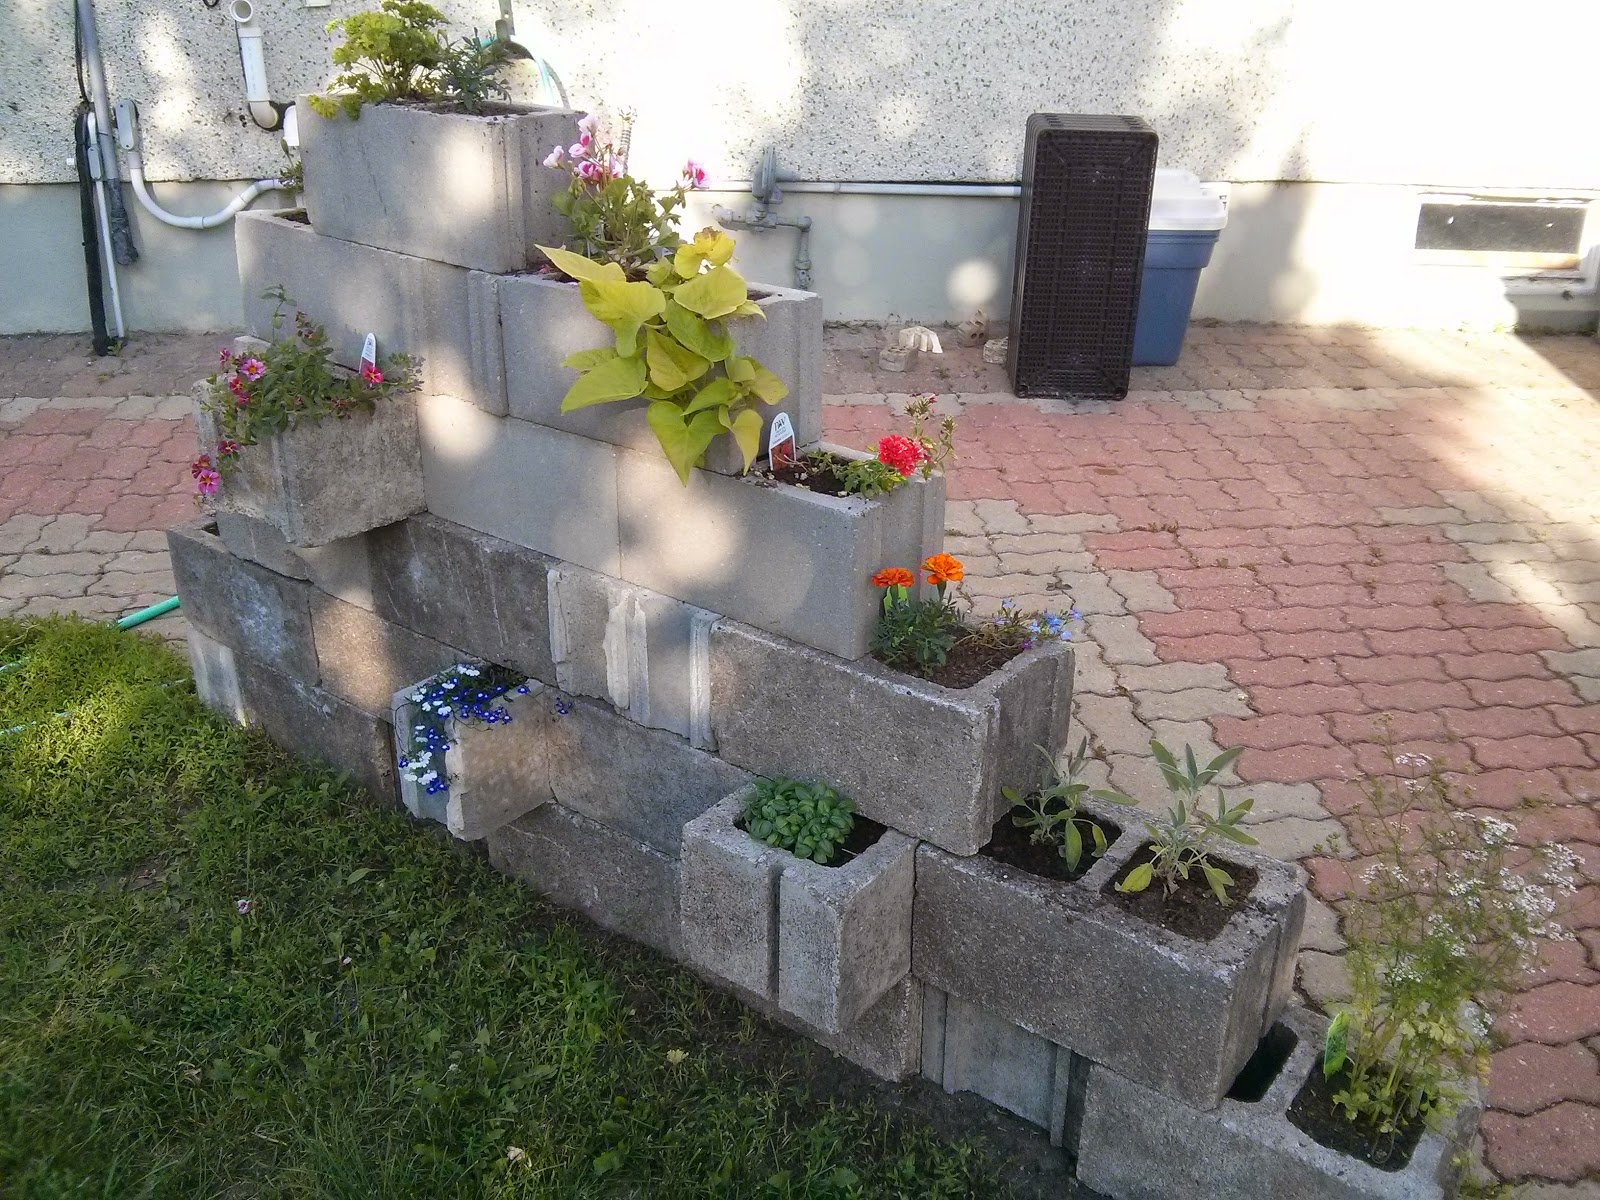
This is how they looked when I first planted everything. I was late in getting things in, so this didn't happen until the first of July! Next year i'll get started sooner.

In this one, i've got parsley, basil, peppermint, cilantro, lavender, sage, oregano, marigolds, geranium, lobelia, and a couple more bright, hanging flowers.


In this, our smaller bug repelling wall, we've got marigolds, geranium, lemon balm, lemon thyme, rosemary, basil, peppermint, lavender, bee balm and an extra lobelia for added colour.


What each plant repels:
Marigolds: mosquitoes, 
Geranium: mosquitoes, beetles
Lemon Balm: mosquitoes
Lemon Thyme: mosquitoes
Rosemary: slugs, flies, mosquitoes
Basil: flies, mosquitoes
Peppermint: flies, aphids, mosquitoes, some beetles
Lavender: moths, fleas, flies, mosquitoes
Bee balm: mosquitoes

I wanted to also get lemongrass and citronella, but couldn't find any, late as I was getting these in the first place. I'll try again next spring for those.

Two weeks later, we've already got some growth!


I ended up moving the lavender into a big pot so that it had more room to take off.


Two weeks later, there's explosive growth!


And these are the most recent pictures... Two weeks later. Unbelievable growth and very ready to harvest! It amazes me how fast changes happen in nature.


I absolutely love the look of these, and am so happy we did it! All in all, including plants, black earth, manure, peat moss, the cinderblocks, construction cloth and adhesive, and landscaping cloth, we spent about $150 for all of this! I'd say that's a pretty good price for what we got out of it!

We plan on making a few oil infusions with some herbs for winter cooking, and are hoping to bring a few inside to over-winter. We'll see how that goes!